Monday, December 19, 2005

Gothic Revival


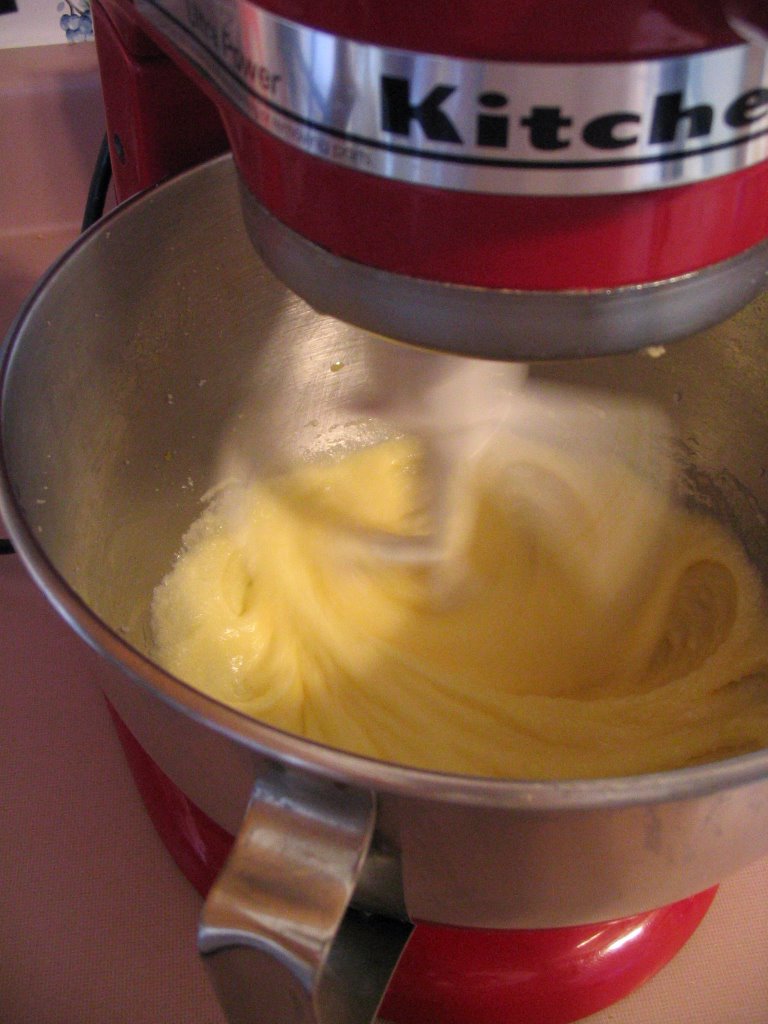
I decdied to make the Bundt Coffee Cake from the Dec. 2005 issue of Cooking Light. I made it, froze it, and will take it with us on our Christmas trip to VA. From start to finish, it was lovely. The pale yellow of the batter (left) promised the cake would be delicious.
I used the Gothic Cathedral (or some such name) bundt pan we received as a wedding gift from our then-neighbors across the street.

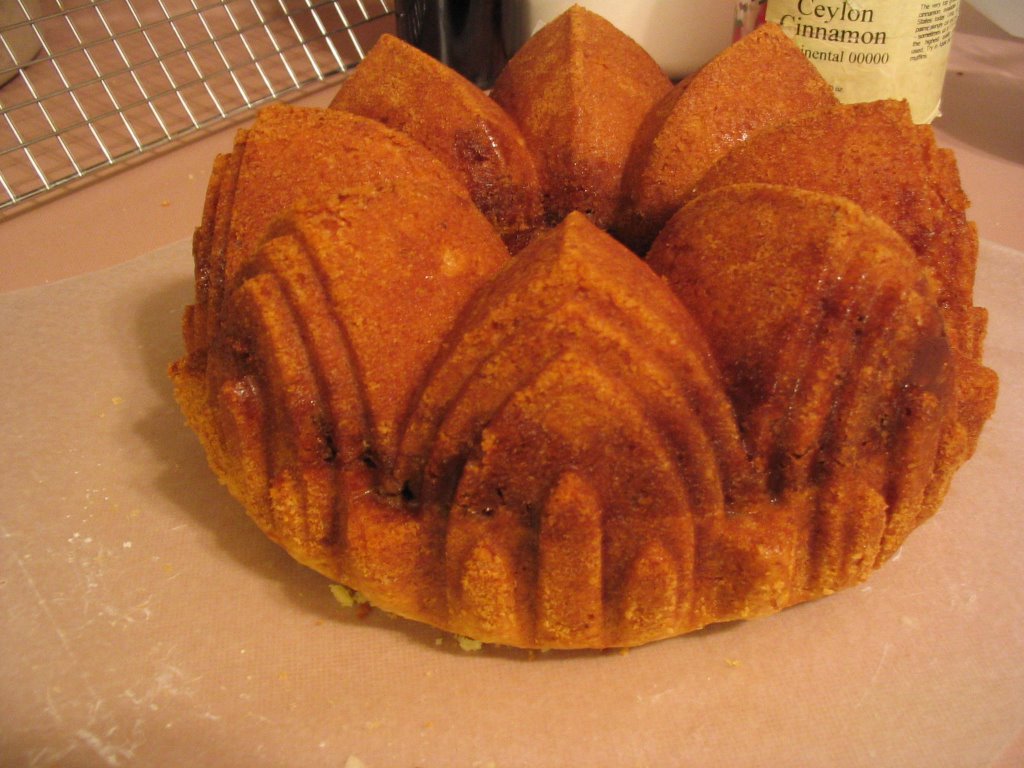
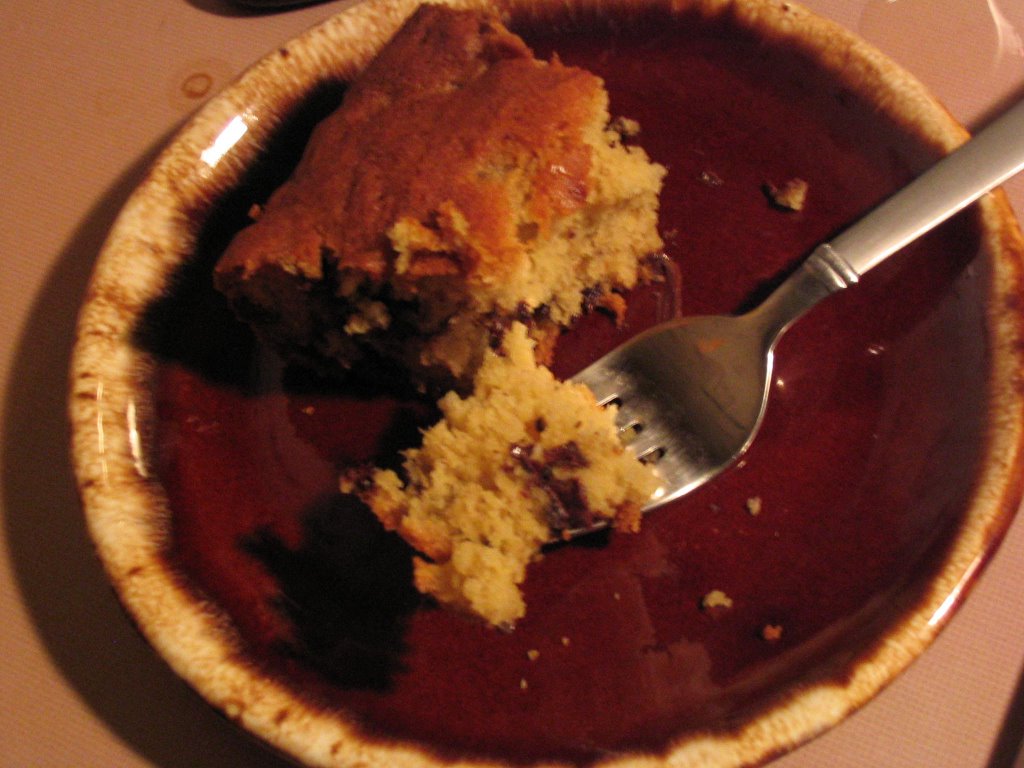
The secret (shh!) to this cake is the hidden layer of cinnamon, butter, brown sugar, and pecans. I cannot wait to cut into this and nibble on it with a hot cup of coffee! (You can see a dark ring around the middle -- that's the secret filling!)


Here is the recipe:


Bundt Coffee Cake

Cooking spray
1 tablespoon dry breadcrumbs
1 1/2 cups granulated sugar
1/4 cup butter, softened
2 large eggs
1 large egg white
1 1/4 cups fat-free sour cream
1 teaspoon vanilla extract
2 1/2 cups cake flour (about 10 ounces)
2 teaspoons baking powder
1/2 teaspoon baking soda
1/2 teaspoon salt
1/4 cup all-purpose flour (about 1 ounce)
3/4 cup packed brown sugar
1 teaspoon ground cinnamon
1/4 teaspoon salt
1 tablespoon butter, chilled and cut into small pieces
1/4 cup chopped pecans
1 teaspoon powdered sugar

Preheat oven to 350°.
Coat a 12-cup bundt pan with cooking spray; dust with breadcrumbs.
Place granulated sugar and 1/4 cup butter in a large bowl; beat with a mixer at medium speed until well blended.
Add eggs and egg white, 1 at a time, beating well after each addition.
Beat in sour cream and vanilla.
Lightly spoon cake flour into dry measuring cups; level with a knife.
Combine cake flour and next 3 ingredients (through 1/2 teaspoon salt), stirring with a whisk. Add cake flour mixture to butter mixture, beating at low speed until blended.
Lightly spoon all-purpose flour into a dry measuring cup; level with a knife.
Combine all-purpose flour, brown sugar, cinnamon, and 1/4 teaspoon salt; cut in 1 tablespoon butter with a pastry blender or 2 knives until the mixture resembles coarse meal.
Stir in pecans.
Pour half of batter into prepared pan. Sprinkle with pecan mixture.
Pour remaining half of batter over pecan mixture.
Bake at 350° for 40 minutes or until a wooden pick inserted in center comes out clean.
Cool completely on a wire rack. (I let mine cool and it wouldn't come out, so I reheated it for 7 mins., and it popped right out.)
Invert onto a platter.
Sprinkle with powdered sugar. (or before doing this, wrap tightly in plastic wrap and/or wax paper, then in aluminum foil or a freezer bag and freeze for up to one month.)

Yield: 14 servings (serving size: 1 slice)

CALORIES 316(19% from fat); FAT 6.6g (sat 2.4g,mono 2.8g,poly 0.8g); PROTEIN 5.1g; CHOLESTEROL 45mg; CALCIUM 91mg; SODIUM 309mg; FIBER 0.8g; IRON 2.4mg; CARBOHYDRATE 59.2g

Cooking Light, DECEMBER 2005

Thursday, December 15, 2005

Banana Bread -- an old friend

I have been wanting to have something coffee-cakey with my coffee in the morning. I eat lots of high-fiber cereal, and sometimes just need a break. I also had to very black bananas sitting on my counter that needed to be repurposed. Thus, I dug out my banana bread stand-by recipe.
Instead of baking it in a loaf pan, I used my new Emile Henry heart-shaped baking dish. It is truly a lovely cake in this pan.

'Tis the season for cookies, dog cookies!


I made Pooches' Peanut Butter Cookies on Tuesday (12/13) night. I like this recipe because it is simple, all natural, and pretty healthy for the dogs. My husband and I only buy all-natural dog biscuits for our doggies, but this time of the year, I make them for our dogs and to give to doggie friends. They have received the Discriminating Canine's Four Paws of Approval.

Here is the recipe:

Pooches’ Peanut Butter Cookies

2 cups whole-wheat flour
1 cup wheat germ
1 cup peanut butter (I used all-natural so I had to add a bit more oil and another ¼ cup water)
1 egg
1/4 cup vegetable oil
1/2 cup water
1/2 teaspoon salt
Preheat oven to 350 degrees F.
Combine flour, wheat germ and salt in large bowl.
Mix in peanut butter, egg oil and water.
Roll dough out onto a lightly floured surface till about 1/2 inch thick
Cut out the cookies using a cookie cutter (I use a dog bone shaped cutter given to me by my MIL. It is rather large, so this year I added a small gingerbread person, star, and Christmas tree for those being given to dogs smaller than ours.)
Put the cookies onto an ungreased baking sheet (I used my Silpat – works fine as always). Bake 15 mins for the smaller sized cookies and up to 35 mins. for larger shaped ones. Store in the fridge as they have no preservatives ...if they last that long!!!!!!!!!

Here are two of the lucky recipients of this year's PB Cookies -- our dogs, of course!


Sprite is on the left.
Rosco is on the right.

Tuesday, November 22, 2005

This is a baby quilt I made for my college roomie's son, Ben. I call it Ben's Bug Blankie. Both of Ben's parents are biologists, and his daddy specializes in ants (Ben's mommy correct me if I am wrong!). So, the motivation here was LOTS of color and LOTS of bugs. I hope big Ben hasn't grown too big for his blankie yet! He just turned 2, and I finished this shortly after he was born (finished date -- Sept/Oct 2003).

Sunday, November 20, 2005

Toast Jenga anyone?


You know Thanksgiving is just around the corner when "Toast Jenga" begins appearing on kitchen counters across the country.

Friday, November 18, 2005

Mmm...real italian pizza by the seaside


My husband and I ate at this great pizza joint, Francesco's, in Flagler Beach, Florida this past weekend. We had the eggplant pizza. It was like eggplant parmesan on a crust.

This restaurant is very interesting in that it is in two-parts: the larger dining room/kitchen features up-scale Italian cuisine, while the small pizza joint is just that, small and a joint (however, I LOVED IT!).

The joint is a quaint storefront that consists of a small counter with two barstools, behind which the pizza Don throws and handles the dough before topping it and sliding it into a very hot oven. Also inside is a cooler with beer and sodas and three booths. On the "porch" in front of the store are two more "open-air" booths, which is where we elected to sit. The place is so small, if you need to use a restroom, you must go to the "fancy" part of Francesco's next-door.

Again, the pizza was awesome, as can be seen here -- I was well into my second piece before I could stop to take a picture. If you ever make it to the East Coast of Florida, check this place out!

Ciao!

Thursday, November 17, 2005

A few of my favorite sites...

I wanted to add a few of my favorite sites that I visit often.

Baby Clothes Swap
A great place to buy gently used children's and maternity clothing at very reasonable prices. You can also send in your used kid's clothes for cash.

Wee Wonderfuls
Hilary Lang makes the most amazing softies. Take a look at her gallery of toys and dolls, and fall in love....


Lick the Spoon
Chandra blogs about her adventures in the kitchen, and has some of the best food photography out there. It will make you want to run home and whip up some decadent dessert in your kitchen, just so you can lick the spoon!

Knitty
This is a cool site devoted to all things knitting. Need I say more?

Cooking Light
My favorite food magazine. I tend to make numerous recipes from this magazine, and from the associated bulletin board. CL Rocks!

This is a felted bag that I knitted for my friend Kristin (she loves pink!) for her birthday in 2004. The inside is lined with a pink cotton. The handles are purchased bamboo rings.

I had no pattern for this bag, just an idea in my head. I think it measures about 10-12 inches long (finished), and 5-8 inches in height (finihsed). I know Kristin gets a lot of compliments on it, as she puts it to good use!

Welcome....

This is my initial post to my new blog...Florida Girl Creations...

I hope to make this an on-line showcase/creative outlet where I can share my creations (both edible and non-edible) with the tremendous crafty community that exists out there!

A little about me...I call my blog Florida Girl Creations because I am a native Floridian (born and raised). I learned to sew from my maternal grandparents...they owned a canvas awning shop in Daytona Beach, and I would go there after school and watch them sew huge boat tops, awnings, they even repaired a circus tent once!

When I was about 6 or 7, I received a doll house as a gift for Christmas/Birthday. It wasn't a frilly doll house, and I felt the need to accessorize it. I remember taking scraps of canvas and making bedspreads, curtains, money, and of course, awnings, for my dollhouse. My Papa helped me with the sewing machine. Since I was small, and the machine powerful, I was not allowed to use the electric pedal, rather I hand cranked the needle through the fabric. These are my first memories of sewing....

Growing up in a single-family home, my siblings and I often stayed with our grandmother (our mom's mom) after school. Grandma taught me (and my brother) how to quilt pillowtops. She also tried to teach me how to crochet, but I wasn't coordinated enough for it (however, I am now a fledgling knitter -- my Grandma told me she could never get the hang of knitting). I also made doll clothes for my (and my sister's) Cabbage Patch dolls using a pattern book my Grandma had and fabric scraps she kept in a drawer in her craft room. I was pretty good at making clothes for small softies, but I have never gotten past anything more complicated than a no-sleeve shirt for big girls!

I attemtped every once in a while to sew while in college, but never really got that into it. Maybe because it wasn't as cool as partying, or maybe because I couldn't devote the time needed to such crafty endeavors. Add that to moving to a new residence every year, and not wanting to cart around a bunch of craft supplies, and I put it down until after I graduated from graduate school (with the exception of the few odd curtains I made here and there)!

That brings me to...I moved out of the state a few years back to pursue my career in academia. My now-husband and I became engaged, and I wanted to make something for each of my bridesmaids. I ended up making personalized tote bags for each of them. A friend of mine loved them so much, she asked me to make some for her bridesmaids. Next thing I knew, I was making personalized bags for friends for gifts to wives, friends, cousins, sisters...and Florida Girl Creations was born. I have only sold my bags at one craft fair, but I hope to try it again in the near future.

In addition to tote/market bags, I knit scarves (and one felted purse!), quilt baby quilts, and whatever else suits my fancy. I am starting this blog as a place where I can showcase my creations, feel proud of my accomplishments, and share with the larger crafty community!

Thanks for reading and I would love feedback!

Tanya